Copyright © Vicky Sheridan 2015 All Rights Reserved. Powered by Blogger.

Christmas Crafting Product Pick...


The 'Holly Jolly' collection from Kaisercraft is my product pick for Christmas 2015.
I had the pleasure of working with it for a feature in Issue 87 of PaperCrafter magazine, it's in the shops now.  Here are just three of the ten cards I made, check out this link to the PaperCafter magazine website to see two more.

Two Speedy Christmas Cards

Alphabet stamps my product picks...


I'm a typography fan and this card showcases my two favourite alphabet stamp sets.  They're well used and getting slightly worn so I've been looking for replacements before they wear out completely.


You can't go wrong with a typewriter font and I love this clean and fresh one from Kaisercraft.


Skinny type is a big trend right now, perfect for wedding cards and stationary, here's a really pretty one designed by Lindsay Mason for Personal impressions.


You could really make a statement with this clean and bold font from Avery Elle there's a matching die set too, decisions, decisions!

What are your favourite alphabet stamps?  Can you suggest a set I may have missed?

How to make a Double Dutch fold card...


Here's a step-by-step tutorial for my take on the Double Dutch fold card.  It's so much easier to make than it looks!


First cut card to measure 25 x 20 cm then score on the longer side at 10 and 20 cm and the shorter side at 5 and 15 cm.


Cut away the two side panels to leave just the two 5 x 5 cm panels at the bottom of the card.


Now fold down the top centre panel and crease along the folds with a bone folder.

Mr Mister A4 Ultimate Die-cut & Paper Pack
Denim Blue Large Ribbon Bows
Papermill Direct Smooth Card (Buff)

How to make a Stay Closed Box...


Here's a step-by step guide to make my take on the stay closed box.  Fill it with sweets and treats for a quick and easy gift idea for Father's Day.

First cut card to measure 18 x 21cm then score at 10 and 20 cm on the long side and at 2.5 and 15 cm on the short side.

Now, on the bottom score line, mark at 5 and 15 cm (the centre of each of the two 10 cm panels) and score diagonally from this centre point to the top corners of both panels as marked in pencil above.

Fold all the score lines, cut away the top and bottom section of the 1 cm flap and cut from the top and bottom edge to the apex of each of the three scored triangles.

Fold up to form the box, securing the side flap and four base flaps with extra strong double sided tape.

Supplies List:
Mr Mister A4 Ultimate Die-cut & Paper Pack
Denim Blue Large Ribbon Bows
Papermill Direct Smooth Card (Buff)

Stair Step Card for Father's Day...


The new Mr Mister range from Docrafts. is just perfect for the men in your life and it's arrived in time for Father's Day!  I'm always on the lookout for an on-trend 'man' themed collection and this range with it's eclectic mix of iconic prints, geometric patterns and typography ticks all the boxes for me!
Here I've made a stair step card using papers and elements from the A4 Ultimate Die-cut and Paper Pack.  The finished card is 15 x 15 cm  with a depth of 5 cm but folds flat for posting.

How to make a Stair Step card

Cut 2 pieces of card  to measure 25 x 15 cm and score along both sides at 5 cm intervals so that you have a scored grid of 15 squares on each piece of card.

At the top of each piece cut away 3 squares as shown by the shaded area.

Cut along these two score lines marked in pencil.  Do the same on the second piece of card.

Now fold up the bottom score line on both pieces of card and stick together with strong glue or double sided tape.


Fold over the top score line on all three steps and secure with tape or glue and decorate!

What do you think?  Have you tried this card fold before?  If I've inspired you to give it a go please come back and link to it in the comments..

Supplies List:
Mr Mister A4 Ultimate Die-cut & Paper Pack
Denim Blue Large Ribbon Bows
Denim Blue Fabric Covered Buttons
Buff Smooth Card

Border dies my product picks...


To add a little more interest and liven up this card I added a matching die cut scalloped border to the inside edge.  That's what I like about Kaisercraft paper pads, as well as being slightly larger at 6.5 inches square, they come complete with 4 pages of diecut borders, shapes and elements.
I'm a lot happier with the design now I've added the border, which got me thinking about maybe investing in a set of  scalloped border dies.  So I went searching and searching, here's my pick of the crop!


Lawn Fawn Stitched Border Set, love the stitched detail 


Sizzix Thinlits Die Set - Borders by Stephanie Barnard
A value for money set with 7 dies in the pack plus some double sided patterns so loads of design possibilities.


Xcut Xpress A4 Border Dies 1
A more ornate set of extra long A4 border dies, so may need extended cutting plates.

What do you think?  Which one would you go for?

A spinning dial for PaperCrafter magazine...


 This month sees my first commission for PaperCrafter magazine a quirky little spinning dial card.  I've just got my copy of issue 81 there's a bumper quilling pack as a free gift, 150 quilling strips and a double ended quilling tool. So watch this space for some quilling projects.

A shaker card in yellow and grey...


I'm so pleased to see that shaker cards are back in vogue.  It's been such a while since I've made one though that I needed a quick refresher, so I watched a shaker card tips video on Jennifer McGuire's YouTube channel.  Like all Jennifer's videos it's well paced, full of information and ideas and well worth a watch.  I discovered some really helpful tips to make the fiddly business of encasing the glitter and sequins a whole lot easier.  You may find it helpful too so I've linked to it here.


I've also noted from the many fashion blogs I follow that yellow in all it's shades is the colour for SS15 so this card with it's yellow stripes is a win win in the trend stakes!

A Spring wreath for Your Handmade Home...


The shiny new issue of Your Handmade Home is out now and packed with stylish ways to make over your home. Stitch a stunning patchwork cushion, crochet a colourful hexagon throw, make a set of adorable tapestry egg cosies, knit a cute caravan tea cosy... 
plus brilliant storage ideas, adorable children's toys and so much more!

Not forgetting my paper crafted Spring wreath on page 41.  I shall never tire of seeing my makes in print.  The super styling, stunning photography and the production cycle ( I made this wreath back in October) all add to the thrill!

Upcycled sweater bag via Etsy..

image credit: Etsy
I haven't made anything I can share since my last post, but I can share what I've been buying.
This beautiful bag made from recycled and upcycled sweaters, it's from one of my favourite Etsy shops Karen Meyers.  I'm so pleased with my purchase, you can check out the shop HERE and what's more Karen is making room for new stock so there's 30-50% off some great bags, pouches and hats.

Handy sized scoring board for free...


There's a handy sized scoring board and bone folder free with issue 79 of Papercrafter magazine. So I thought I'd put it through it's paces by making a pinwheel - a true test for any scoring board.  I used a medium weight patterned paper and it was a breeze, nice crisp folds and no tearing.

Embedded image permalink

It's a lovely bright blue too so not likely to get lost in the sea of paper on my craft desk.
The only downside (for me) is it increments in inches but that is more than outweighed by it's handy size meaning it can quite easily live on my craft desk. My Martha Stewart board is seldom used because it's tucked away behind my desk - out of sight out of mind!

Papers and diecuts: Grace Taylor - Modern Cabin

Watercolour Wonder...


I think it's safe to say that watercolour is still a hot hot trend in cardmaking.  It seems that every time I visit the blogs of my favourite paper crafters I see a card featuring yet another cool and inspiring way to use them, like this DIY Watercolour gems tutorial over on Kim Dellow's blog
Now I'm a patterned paper girl through and through, apart from the odd sentiment I hardly use stamps and ink, they're just too unpredictable for the perfectionist in me, I know just where I am with paper.
But, I've been so inspired by the watercolour trend I've decided to venture out of my comfort zone and try a new technique.
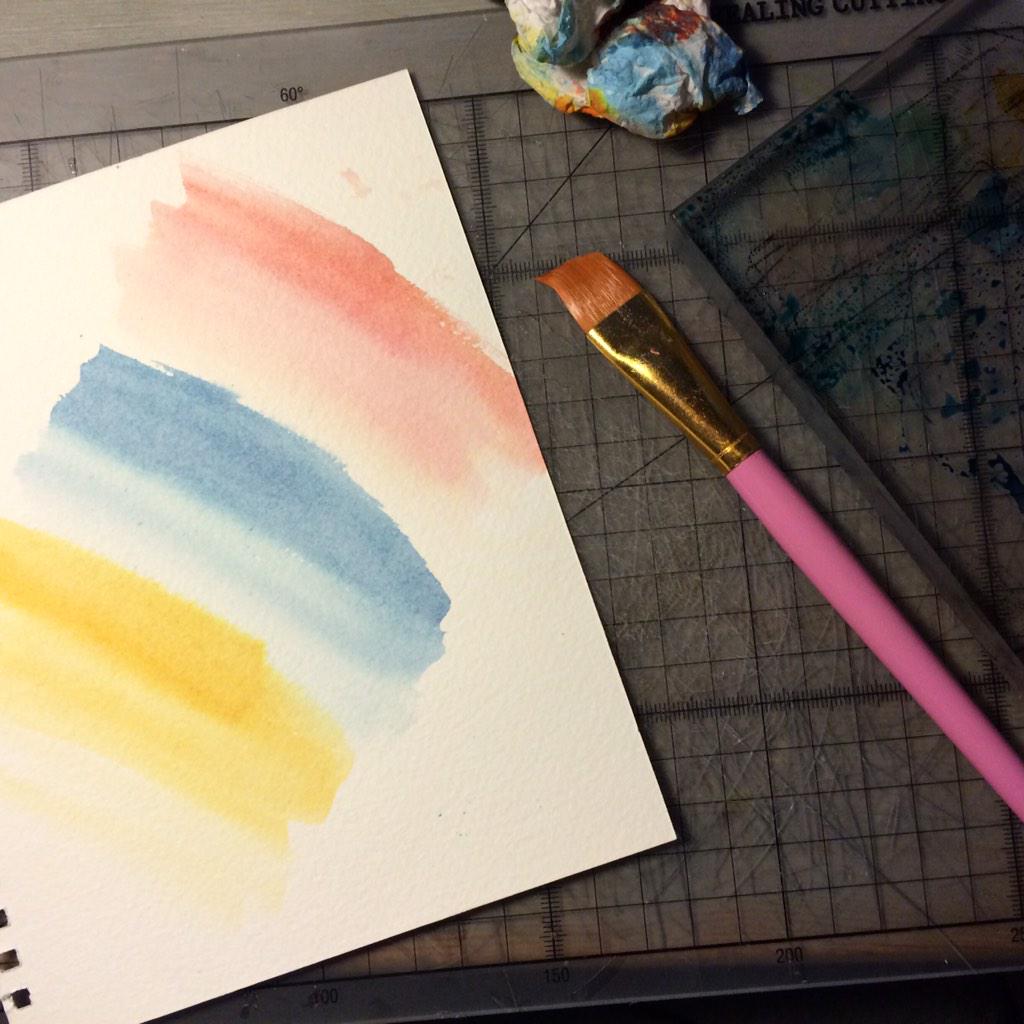
I was really rather taken with the Derwent Graphic Line Painter Pens after seeing them in the demo, so when we met up recently, Kim kindly brought them along, as well as a selection of other watercolour pencils, inks and paints for me to try out, what fun! The Derwent Graphic pens were my favourite and I have them on order, but in the mean time when I got home I had a play with my distress ink pads, water and a brush.


With just a few swooshes of colour on watercolour paper I created the background for the tag on this card.
Now if I can do it then anyone can, so if you haven't dabbled with watercolour yet, I'd recommend you give it a go, you'll be hooked just like me.
For another watercolour tutorial from Kim check out this post DIY watercolour effect over on the Blitsy blog.


Paper Moustache - How to...


Whatever way you spell it, a moustache/mustache makes a fun card, and you can create a DIY 'tache' quite simply using some black card and two different sized circular punches, one should be slightly smaller than the other.  I used a 2 inch and 1 1/2 inch punch for my 'tache',


1.  Cut or punch a circle of card.
2. With scissors cut away a small strip from the centre of the circle
3. With the smaller circle punch or template cut a semi circle from each piece.
4.  Overlap the two halves and secure in the centre with glue


Pinspiration ...


My resolution for Blush Crafts in 2015 is to post regularly.

The first of these regular posts is a monthly feature I'm calling 'Pinspiration'  where I select a pin from my Pinterest boards, recreate the card or project, share it here on the blog and hopefully inspire you to repin it and have a go at the project yourself.

First up in the series is a set of cute little owl cards I found on the Cosmo Cricket blog, I so love Julie Comstock's work and want to 'copy' everything she makes.  If you haven't visited the blog before it's well worth a look.


Handy little cards to have ready made to send for any occasion
What do you think?

Ivory and Buff card - Papermill Direct; Patterned paper - October Afternoon - Midway

Dress to impress with Craftseller...


There's still 10 days left to buy the latest edition (issue 45) of Craftseller it's available from all good supermarkets and WHSmiths.
Don't miss out on over 90 handmade profit-boosting ideas for 2015 including these free papers, inspired by the prints and colours of the Swinging Sixties, plus templates and full instructions to make my party shirt and fancy frock cards.